This post contains affiliate links. Please read our disclosure policy.
A nostalgic cozy treat, made with 100% whole grains! These long john donuts with fresh milled flour are tender, sweet, and perfectly glazed with a rich chocolate frosting. Make them with fresh milled flour or all purpose for the perfect from-scratch breakfast or dessert.

I have such fond memories of getting donuts with my family growing up. For special occasions, like birthdays or the first day of school, we would all choose a donut to have with breakfast.
One of my favorite donut varieties was a chocolate-glazed long john! Now that I’m a mom, I love to treat my kids to donuts on occasion.
When I can, I opt for homemade whole grain donuts, so I can know exactly what’s in them. My kids love it all the same, and I have so much fun making the donuts!
Of course, some of my kids prefer the classic round donut, which I make too! Just with regular flour, try my cinnamon sugar donut recipe if you haven’t already!
These whole grain long john donuts will surprise you with just how easy they are to make. It’s a fun project for a Saturday morning or the next time you need a special treat.
Table of Contents
Why You’ll Love These Donuts
- Whole grain flour: I try to make all of my homemade baked goods with fresh-milled, whole grain flour. This recipe is made with 100% whole grain flour, and you wouldn’t even know it! You can also use all-purpose flour if you prefer!
- Fun bake: I love baking from-scratch sweets, and these donuts are especially fun. It’s so rewarding to make a classic treat like a donut from scratch in your own kitchen!
- Simple ingredients: You can make a batch of these donuts on a whim, because they are made with simple pantry staples! No need for planning ahead or buying special ingredients. I make cinnamon rolls with fresh milled flour regularly for this same reason!
Whole Grain Donuts Ingredients
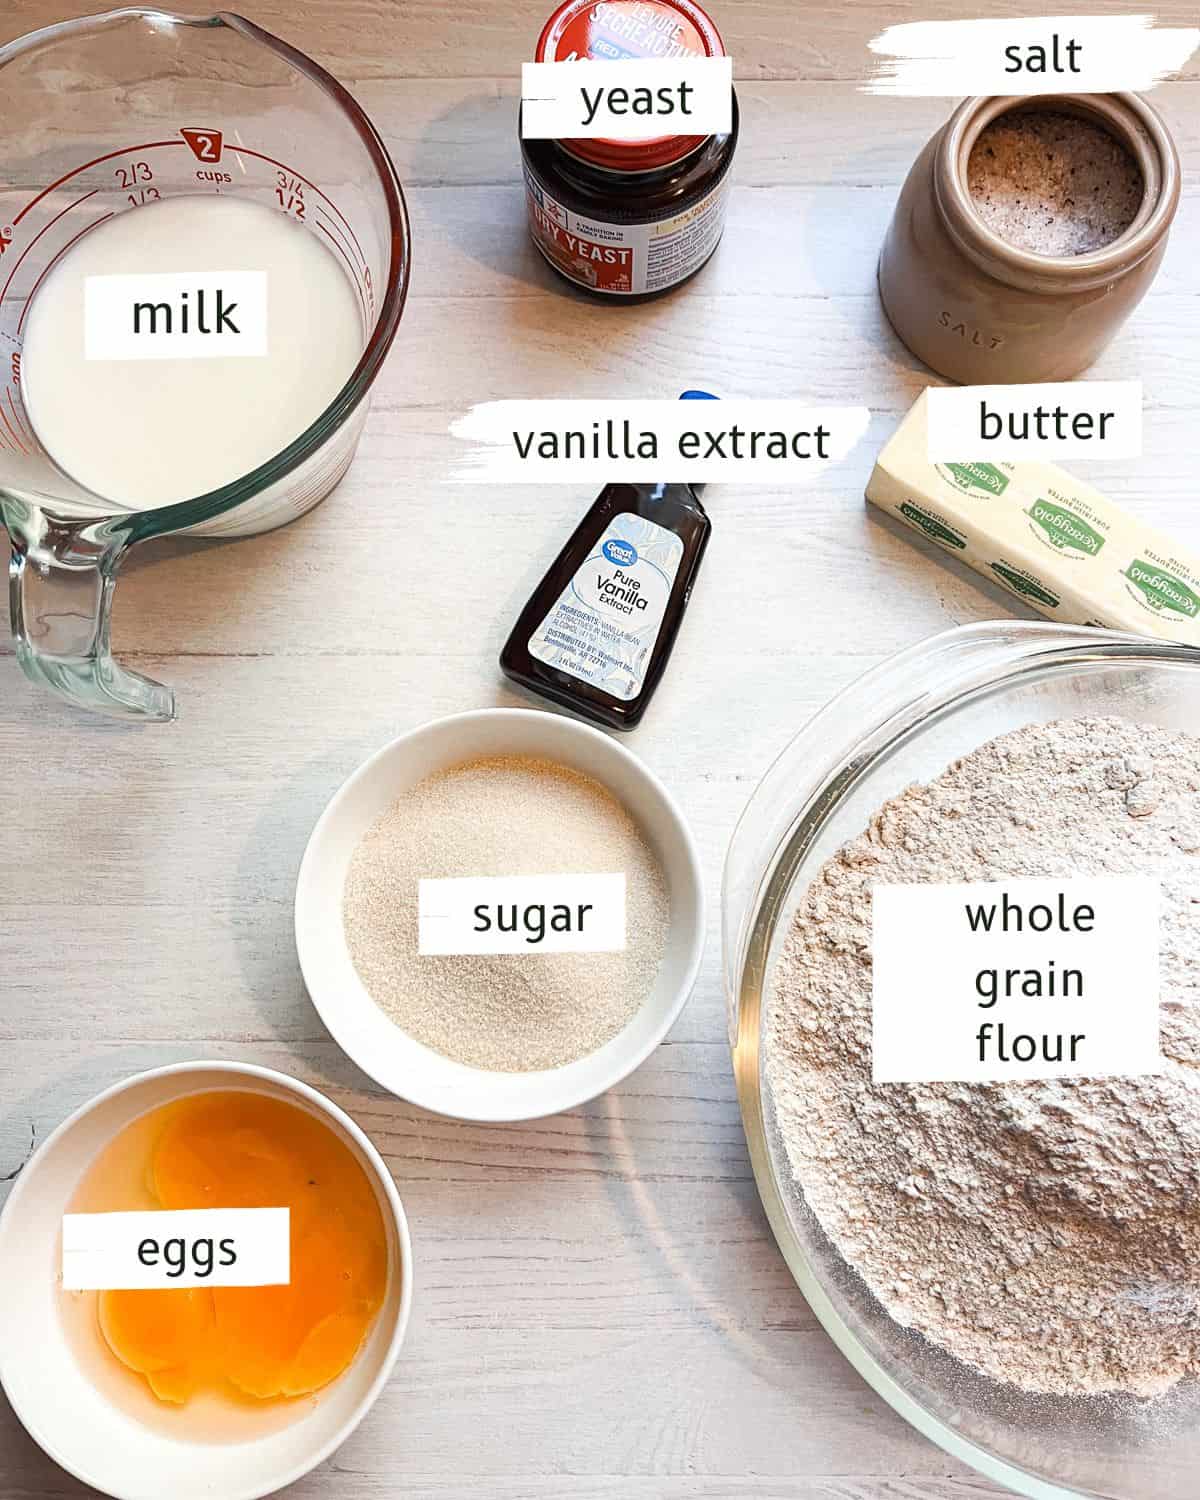
- Milk: Make sure it’s warmed to about 110°F. The warmth activates the yeast, but if it’s too hot, it can kill the yeast.
- Eggs, egg yolk, and butter: These make for a tender donut with a beautifully fluffy texture.
- Active dry yeast: For the perfect rise, make sure you use fresh yeast.
- Sugar: A little white sugar gives this dough a delicate, subtle sweetness.
- Whole grain flour: You can purchase whole grain flour, but I like to mill my own wheat berries. You can learn more in my post on how to mill your own flour.
- Vanilla extract and salt: Two essentials for a flavorful dough!
- Oil for frying: I like to use coconut oil, but any frying oil will work. Just make sure it has a high smoke point.
Chocolate Glaze Ingredients
- Butter: We’ll melt it to mix into the glaze, then the butter will give the glaze a nice structure as it cools to room temperature.
- Cocoa powder: For that delicious chocolate flavor!
- Powdered sugar: Powdered sugar dissolves seamlessly into the mixture, making a smooth and velvety glaze.
- Vanilla extract: The perfect flavor to balance out the chocolate.
- Milk: I always have whole milk on hand, but 2%, skim, or half and half will work too.
How to Make Long John Donuts

Step 1. Warm the milk and activate the yeast
Heat the milk in a small saucepan over low heat until it reaches about 110°F. Transfer the warm milk to a small mixing bowl and stir in the yeast. Let it sit for 5–10 minutes, until foamy.
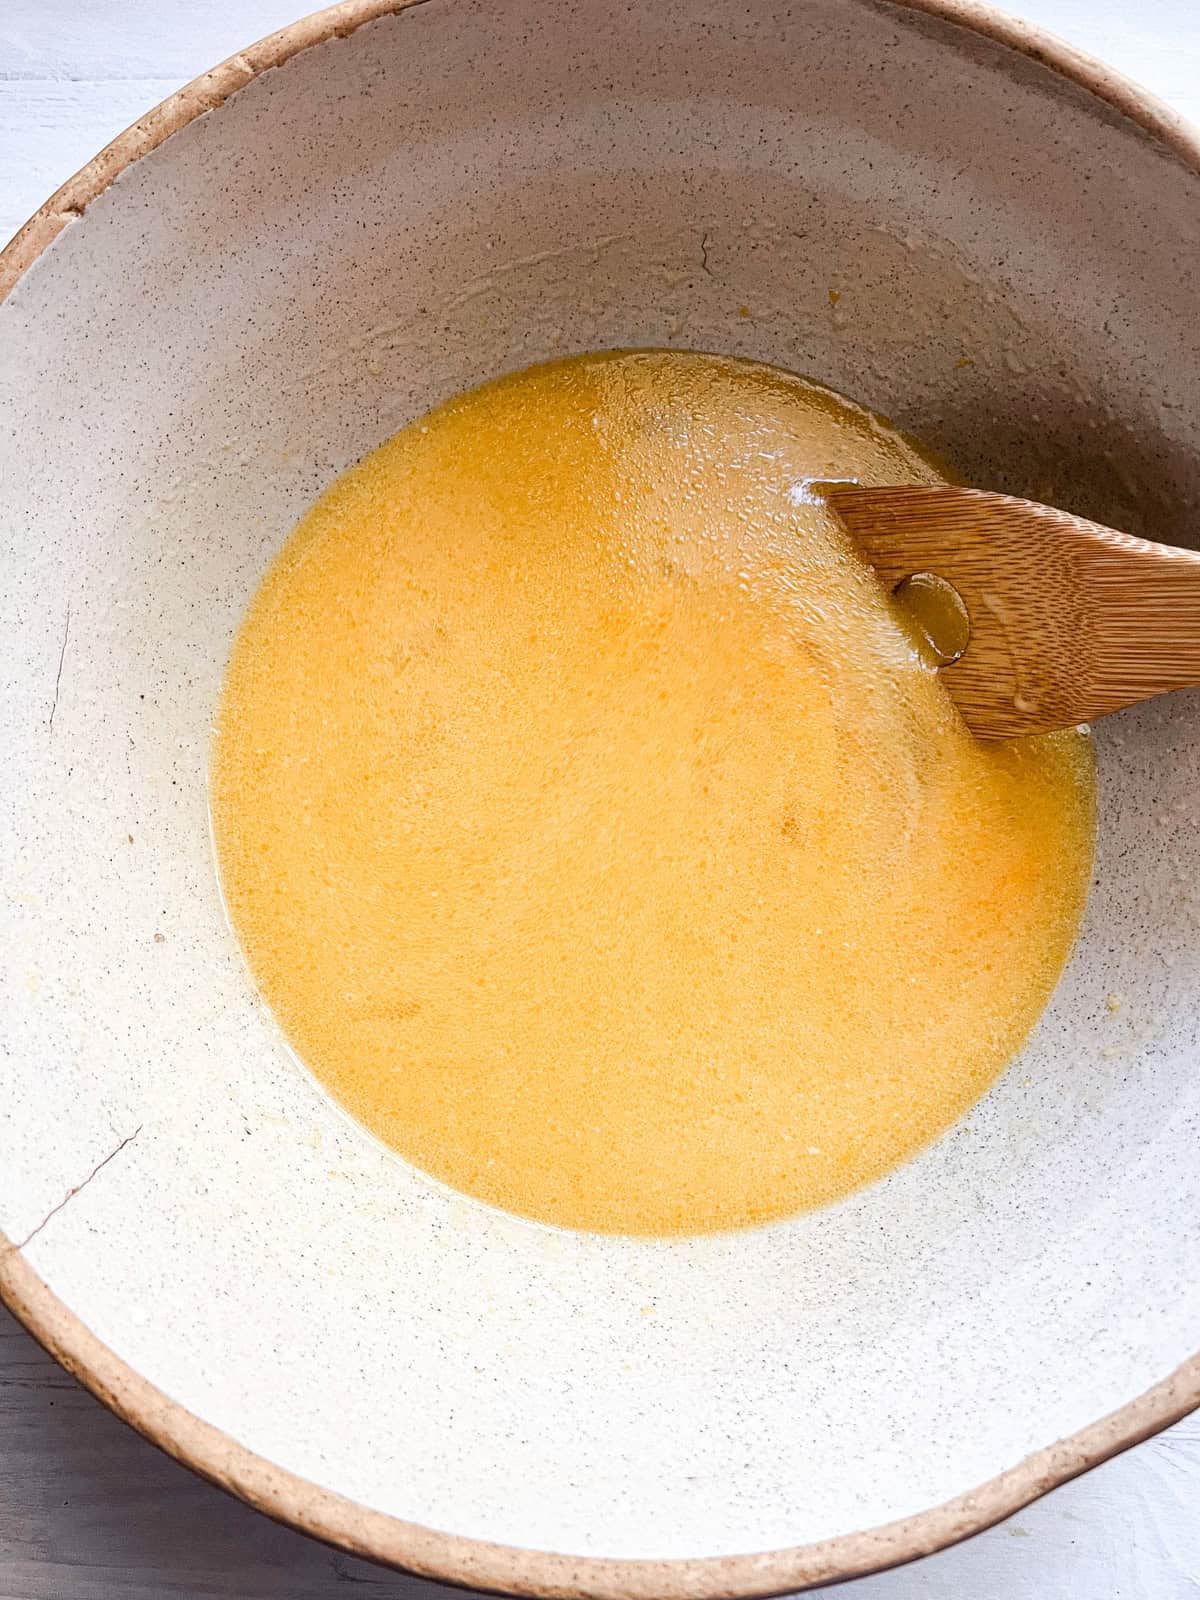
Step 2. Mix the wet ingredients
In a large mixing bowl, whisk together the sugar, eggs, egg yolk, melted butter, and vanilla.

Step 3. Add the dry ingredients
Stir in the flour and salt. Mix until a soft, sticky dough forms.

Step 4. Knead the dough
Turn the dough onto a lightly floured surface and knead for 2–3 minutes. I add about 1/4 cup of flour, and keep my hands floured. It’s going to be sticky, but avoid adding too much flour, or the donuts will be dense.

Step 5. First rise
Lightly grease a clean bowl, place the dough inside, cover with a towel, and let rise in a warm spot for about 1½-2 hours, or until doubled in size.
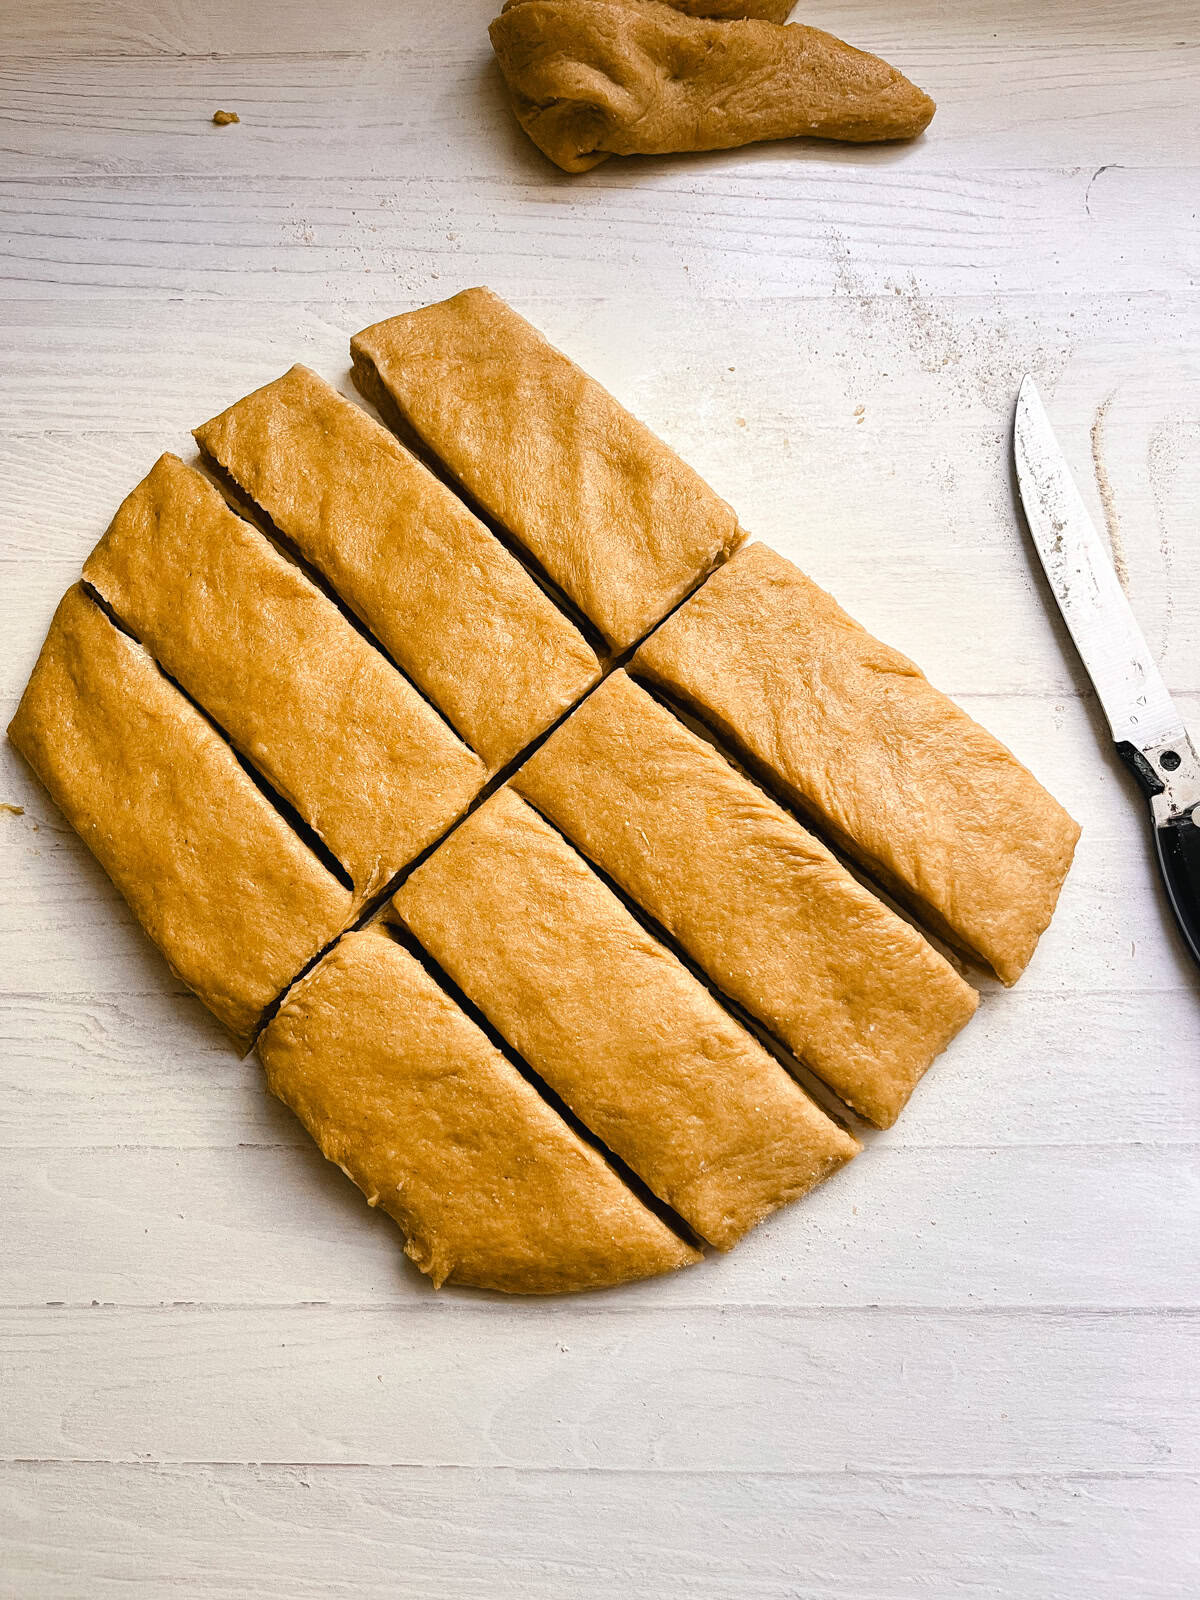
Step 6. Shape the donuts
Once risen, punch down the dough and roll it out to about ½ inch thick. Cut into long rectangles with a sharp knife and place them on parchment paper (*see notes below on how to keep your knife from sticking to the dough).

Step 7. Second rise
Cover and let rise again while you heat your oil.

Step 8. Fry the donuts
Heat around ½” of oil in your Dutch oven to 350°F. Carefully add 2–3 donuts at a time and fry for about 1½-2 minutes per side, until golden brown. Remove and place on paper towels to drain. Keep an eye on your oil and do not let it go over 350°F.

Step 9. Glaze
While the donuts cool, make the glaze by whisking together the ingredients until smooth. Once they are at least cool enough to handle, you can dip the tops in the glaze.

Step 10. Enjoy!
Serve immediately for best results.
My Expert Tips
- You want the dough as sticky as possible, but workable. You’ll need about ¼ cup of flour while you are kneading it by hand before the first rise.
- Basically, the more flour you add, the denser the donuts are going to be. For light and fluffy donuts, add as little additional flour as you can.
- After the first rise, just lightly dust the surface, your hands, and the rolling pin to roll out the dough. Avoid adding a lot of extra flour.
- *Dip your knife blade in water before cutting each strip of dough. This will keep dough from sticking to the blade.
- You can cut the donuts to any size you like, but for a traditional size, cut the dough into 8 pieces.
- You can make this glaze ahead of time and store it in the fridge for a few days. Just warm it slightly before using.
- If you like a thicker coating, dip the donuts in the glaze twice. Just let the first layer set before going in for round two!

Recipe FAQs
I use the Mockmill professional grain mill. I’ve tried several different mills, and this one gives my bakes the best texture by far.
Yes, you can, but I would freeze them before you add the glaze. Once the donuts are cool, pack them into a freezer-safe container (they may get crushed in a bag) and freeze for up to 3 months. Thaw them at room temperature and glaze before enjoying.
Absolutely! After they are glazed, you can pipe jelly, custard, or any other filling of choice into the middle of the donuts.
Sure! Instead of cutting the dough into rectangles, use a donut cutter or two different-sized round cookie cutters to make a traditional donut shape.
If your glaze is a bit thick and gloopy, you can put the bowl in the microwave for about 10 seconds. That will thin it out and allow for a smooth, glossy finish on your donuts!
Hey, if you are into the whole freshly milled scene, be sure to try my newest freshly milled twisted donuts! I made them a bit differently than you might think, but my oh my, they turned out delicious!
More Freshly Milled Recipes
- Freshly Milled Pumpkin Roll
- Freshly Milled Pancakes
- Dutch Baby Pancake with Whole Grain Flour
- Whole Grain Blueberry Muffins
- Whole Grain Bagel Recipe
- Fudgy, Freshly Milled Brownies
If you tried these Long John Donuts with fresh milled flour or any other recipe on my website, please leave a star rating and let me know how it went in the comments below. Thanks for visiting!

Long John Donuts With Fresh Milled Flour
Equipment
Ingredients
For the Donuts
- 1¼ cups whole milk
- 2¼ teaspoons active dry yeast 1 packet
- ⅔ cup sugar
- 2 large eggs
- 1 egg yolk
- ½ cup butter melted (1 stick)
- 1 teaspoon vanilla extract
- ½ teaspoon sea salt
- 4¼ cups whole grain flour (sub for all-purpose) plus more for kneading and dusting
- Oil for frying I use coconut oil, but canola works great too
For the Chocolate Glaze
- ½ cup butter melted
- ½ cup cocoa powder
- 2 cups powdered sugar
- 1 teaspoon vanilla extract
- 2 tbsp milk
Instructions
- Warm the milk: Heat the milk in a small saucepan over low heat until it reaches about 110°F.
- Activate the yeast: Transfer the warm milk to a small mixing bowl and stir in the yeast. Let it sit for 5–10 minutes, until foamy.
- Mix the wet ingredients: In a large mixing bowl, whisk together the sugar, eggs, egg yolk, melted butter, and vanilla.
- Add the dry ingredients: Stir in the flour and salt. Mix until a soft, sticky dough forms.
- Knead the dough: Turn the dough onto a lightly floured surface and knead for 2–3 minutes. I add about 1/4 cup of flour, and keep my hands floured. It's going to be sticky, but avoid adding too much flour or the donuts are going to be dense.
- First rise: Lightly grease a clean bowl, place the dough inside, cover with a towel, and let rise in a warm spot for about 1½-2 hours, or until doubled in size.
- Shape the donuts: Once risen, punch down the dough and roll it out to about ½ inch thick. Cut into long rectangles with a sharp knife and place them on parchment paper. Cover and let rise again while you heat your oil. (see notes below on how to keep your knife from sticking to the dough)
- Fry the donuts: Heat around a 1/2" of oil in your Dutch oven to 350°F. Carefully add 2–3 donuts at a time and fry for about 1½-2 minutes per side, until golden brown. Remove and place on paper towels to drain. Keep an eye on your oil and do not let it go over 350°F.
- Glaze: While the donuts are cooling, you can whip up the chocolate glaze (see instructions below), and once they are at least cool enough to handle, you can dip the tops in and let them set before serving!
To Make the Glaze
- In a medium bowl, whisk together all the ingredients until smooth.
Notes
- You want the dough as sticky as possible, but workable. You’ll need about ¼ cup of flour while you are kneading it by hand before the first rise.
- Basically, the more flour you add, the denser the donuts are going to be. For light and fluffy donuts, add as little additional flour as you can.
- After the first rise, just lightly dust the surface, your hands, and the rolling pin to roll out the dough. Avoid adding a lot of extra flour.
- Dip your knife blade in water before cutting each strip. This will keep dough from sticking to the blade.
- If your glaze is a bit thick and gloopy, you can put the bowl in the microwave for about 10 seconds. That will thin it out and allow for a smooth, glossy finish on your donuts!
- You can cut the donuts to any size you like, but for a traditional size, cut the dough into 8 pieces.
- You can make this glaze ahead and store it in the fridge for a few days. Just warm it slightly before using.
- If you like a thicker coating, dip the donuts in the glaze twice. Just let the first layer set before going in for round two!
- Be sure to check out the video above to get an idea of the dough texture and how I make it workable while it’s still sticky!


Is 510g the correct flour amount? It was quite sticky, I ended up scooping and frying balls which worked out okay, but not the dough I was expecting. Thanks!
Hi! Yes, 510g is right! This dough is meant to be sticky, so you’re spot on there too. You can work in a touch more flour, just enough to make it workable, and wet fingertips help a ton when handling it.
Honestly though, frying them up as little balls sounds like the best kind of happy accident! Thanks so much for making them.
these look amazing! that glaze!!!!!
Oh the glaze is to die for! Let me know how they turn out for you!
Seriously ridiculously good!
Thank you so much! I am so very happy to hear you loved them!